Hen Kiev | Diethood
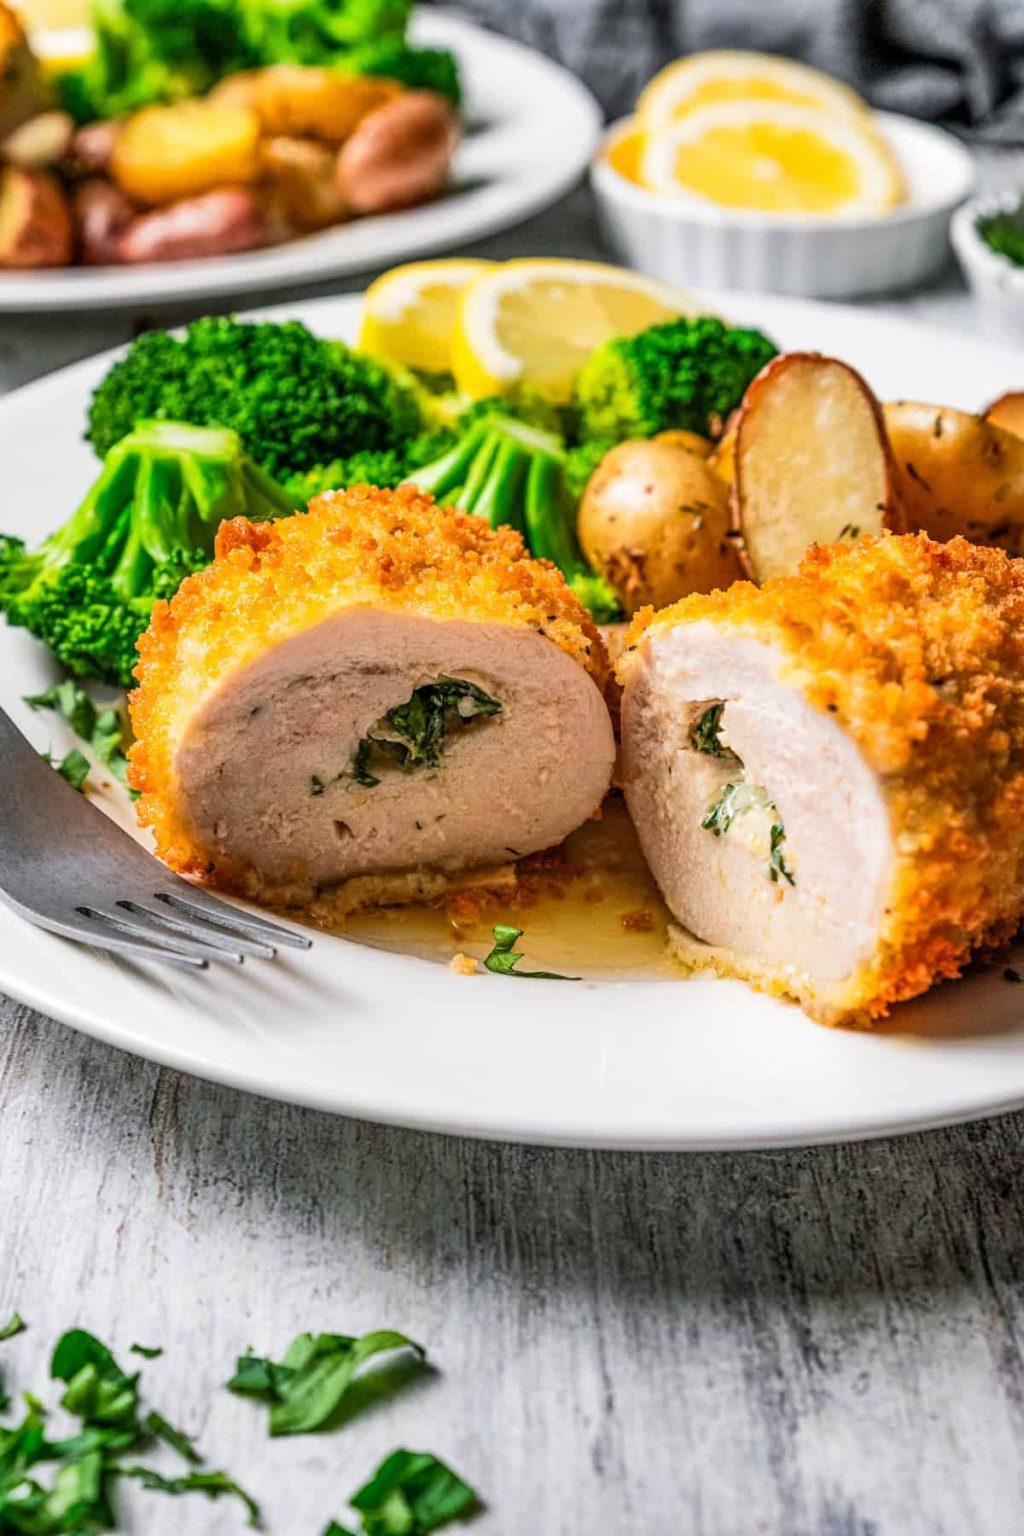


Hen Kiev is crispy crumbed hen full of lemony garlic and herb butter. It’s crunchy exterior, juicy inside, and so scrumptious! This hen recipe is a traditional dish with a great deal of taste, and it’s tremendous easy to make.
For those who love the crunch of hen Milanese and the additional taste that comes from stuffed hen, you’ll be head over heels for hen Kiev!

As somebody who cooks hen usually, hen Kiev is a kind of dishes that also makes me sit again and suppose “Whoa!” at first chew. It’s succulent inside, crunchy exterior, and so filled with taste that it’s ridiculous. And all of it comes all the way down to somewhat effort and an entire whack of herb butter– my type of meal!
Why I Love This Hen Kiev Recipe
- Juicy and flavorful. Traditional hen Kiev is full of a garlicky parsley compound butter. The butter melts into the hen because it cooks, and the result’s hen that’s juicy, tender, and full of taste.
- Easy technique. Filling and rolling the hen follows an identical technique as my stuffed pork loin and stuffed flank steak recipes. You don’t have to be a MasterChef to do it, and I’ll stroll you thru the steps.
- It’s baked AND fried. I evenly fry my hen Kiev earlier than baking it for the utmost crispiness. It’s an additional step, however completely value it for that good, crispy, golden exterior.
- Excellent for an important day. Hen Kiev is straightforward sufficient to make day-after-day, however I particularly love making it for Valentine’s Day and even an important day like Father’s Day. It’s fancy-looking however uncomplicated, and it goes with a great deal of totally different sides.


Components You’ll Want
Hen Kiev and different stuffed hen dishes are common in Jap Europe, however there’s an opportunity it has origins in French cooking, too. It’s a little bit of a thriller.
All I do know is that it’s scrumptious, and the elements are tremendous easy. I am going over them under with some notes, and you’ll discover the printable recipe card adopted by a photograph step-by-step on the backside of the put up.
- Hen – I like to recommend skinless, boneless hen breast fillets. You’ll find hen breasts pre-trimmed in grocery shops or trim them your self.
- Flour – All-purpose flour creates a light-weight base coat that helps the remainder of the breading adhere to the hen. I haven’t tried different kinds of flours, however you probably have, I’d love to listen to your options within the feedback!
- Eggs – Overwhelmed for an egg wash.
- Breadcrumbs – I like to make use of panko breadcrumbs since they’re bigger and crunchier. Nonetheless, any breadcrumbs will work. They are often seasoned or unseasoned.
For the Compound Butter
- Butter – Take your butter out of the fridge forward of time in order that it might probably soften. Butter is MUCH simpler to combine when it’s at room temperature.
- Garlic – Freshly minced. You might substitute ¼-½ teaspoon of garlic powder per clove, however I’d solely do that in a pinch.
- Parsley – Chopped contemporary parsley is the traditional alternative for hen Kiev. Be at liberty to offer your butter totally different flavors with extra herbs like basil, thyme, and oregano.
- Lemon Zest – My private contact to this traditional recipe. Lemon zest isn’t historically utilized in hen Kiev recipes, however I really like how contemporary lemon zest brightens up the herby butter. Attempt it, you’ll see!

Ideas and Variations
- Chill the butter lengthy sufficient. It’s essential to refrigerate the compound butter till it’s utterly agency once more. This manner, the butter stays intact when you roll it up contained in the hen, and it’s much less prone to leak.
- Don’t skip the freezing step. Chilling the hen Kiev within the freezer provides the butter and hen an opportunity to agency up, making it simpler to coat with the breading.
- Verify that the hen is completed. Use an instant-read thermometer to verify the interior temperature of the hen reaches 165ºF.
- Relaxation the hen. Similar to you’d relaxation a steak after cooking, resting hen provides the juices inside an opportunity to redistribute and makes the hen tremendous tender.
Continuously Requested Questions
Since I deep-fry the hen first, this hen Kiev wants solely about 15-20 minutes within the oven at 350ºF. For those who skip the deep-frying step, it’ll want barely longer to bake. The hen is cooked when the interior temperature reaches 165ºF.
A typical drawback when making hen Kiev is that butter could leak out the edges whereas it cooks. Freezing the hen earlier than cooking helps maintain all the things in place. I’ve additionally heard of cooks baking hen on prime of a slice of bread in order that the bread absorbs any leaking garlic butter. The thought is that it avoids a multitude, and you’ve got garlic bread as a facet, which sounds GENIUS, although I haven’t tried it but.
Hen Kiev, or hen Kyiv, is called after the Ukrainian metropolis of Kyiv. The story goes {that a} chef from there refined the recipe as we all know it right now. So, technically, it’s the chef who’s from Kyiv, not the dish!

Storing and Reheating Leftovers
- Refrigerate. Retailer any leftover hen Kiev hermetic within the fridge for as much as 3 days. The crispy breading loses a little bit of its texture after some time, however it nonetheless reheats nicely sufficient; see the subsequent level.
- Reheat. I prefer to reheat hen Kiev within the oven, as soon as once more on a wire rack with a baking sheet. Heat the hen at 400ºF till it’s scorching all through. You might additionally use your air fryer.
Pin this now to seek out it later
-
Mix the butter elements. Add softened butter, garlic, and parsley in a bowl. Stir nicely till mixed. In case you are utilizing lemon zest, now’s the time so as to add it.
-
Chill. Place the butter on a chunk of plastic wrap. Roll it right into a log form and twist the ends of the plastic wrap. Refrigerate the butter till agency.
-
Pound the hen. Place hen breasts between two items of plastic wrap (separately) and pound with a meat mallet to ¼-inch thickness. Season the hen to style with salt and pepper.
-
Roll the hen. Minimize the butter into 4 equal items. Place one piece of butter within the heart of the pounded hen. Fold the edges of the hen breasts over the butter and roll from the narrower facet till you could have a log form. Repeat with the remaining butter and hen breasts. Wrap the ready hen with plastic wrap and freeze for half-hour. Within the meantime, put together the breading station.
-
Put together the breading station. Add flour in a shallow extensive bowl, with a pinch of salt and pepper. Stir to mix. Whisk the eggs with a pinch of salt and pepper in a separate bowl and add the panko breadcrumbs into the third bowl.
-
Coat the hen. Fastidiously take away plastic wrap from the hen. Coat the hen with flour, then eggs, shaking off the surplus eggs. Lastly, coat the hen with panko breadcrumbs.
-
Fry the hen. Warmth oil in a deep fryer to 375ºF. In the meantime, preheat the oven to 350ºF. Fry the hen for 1-2 minutes per facet or till golden.
-
Bake the hen. Place a wire rack on prime of the baking sheet. Add the fried hen breasts to the wire rack and bake for 15 to twenty minutes or till the inside temperature reaches 165ºF. Permit the hen to relaxation for five minutes earlier than serving and chopping.
- Mixing the butter: You need to use a mortar and pestle to mix the butter with garlic and herbs.
- Breadcrumbs choices: For those who shouldn’t have panko breadcrumbs, traditional plain breadcrumbs may also work.
- Freeze the hen: Don’t skip the freezing step – that is essential because the hen will develop into firmer, and you may coat it properly with the breading elements.
- Including taste: Lemon zest shouldn’t be historically utilized in hen Kyiv however will give an incredible twist to this traditional dish.
Energy: 611kcal | Carbohydrates: 46g | Protein: 46g | Fats: 25g | Saturated Fats: 13g | Polyunsaturated Fats: 2g | Monounsaturated Fats: 7g | Trans Fats: 1g | Ldl cholesterol: 236mg | Sodium: 452mg | Potassium: 774mg | Fiber: 2g | Sugar: 2g | Vitamin A: 863IU | Vitamin C: 5mg | Calcium: 91mg | Iron: 4mg
Dietary information is an estimate and offered as courtesy. Values could range in line with the elements and instruments used. Please use your most well-liked dietary calculator for extra detailed information.
The way to Make Hen Kiev
This simple hen Kiev recipe begins equally to hen paillard, the place you’ll pound the hen fillets in order that they’re skinny sufficient to roll. In the meantime, we’ll make the fast and straightforward compound butter the identical manner I make cowboy butter and the ending butter I exploit for my tomahawk steaks. Let’s get began:
- Put together the butter. Combine softened butter with garlic, parsley, and lemon zest. You may mix the elements utilizing a spatula and elbow grease, or a mortar and pestle additionally works nicely right here.
- Wrap and chill. Afterward, switch the butter to a sheet of plastic wrap or parchment paper, then roll it up right into a log and twist the ends closed. Chill the butter within the fridge till it’s agency once more.


- Pound the hen skinny. One by one, use a rolling pin or meat mallet to pound the hen fillets between two sheets of plastic wrap. Flatten the hen to about ¼” thickness. Afterward, season to style with salt and pepper.
- Fill and roll the hen. Subsequent, take out your compound butter and minimize it into 4 items. Place a chunk of butter within the heart of every flattened hen fillet. Then, roll the hen up across the butter by folding the edges in first, then rolling it right into a log form (just like a burrito).


- Freeze. When you’ve rolled your entire hen, wrap it in plastic wrap and place it into the freezer for half-hour. This lets the hen agency up earlier than you bread it.
- Prep the breading station. In the meantime, add the flour to a shallow bowl, together with salt and pepper. In a separate bowl, whisk the eggs, and fill a 3rd bowl with panko breadcrumbs.


- Coat the hen. Whenever you’re able to bread and prepare dinner the hen, unwrap it, and dip every hen roll-up in flour, then the egg, and at last into the breadcrumbs.
- Fry. Subsequent, warmth oil in a deep fryer or a big Dutch oven with tall sides. As soon as the oil reaches 375ºF, add the hen. Cook dinner for 1-2 minutes per facet till the skin is golden and crispy.


- Bake. Lastly, prepare the fried hen on prime of a wire rack set over a baking sheet. Bake in a 350ºF oven for 15-20 minutes or till the hen cooks via. Afterward, let your hen Kiev relaxation for five minutes, then serve!

Extra Straightforward Hen Recipes